Solr search engine
ezplatform-solr-search-engine aims to be a transparent drop-in replacement for the SQL-based Legacy search engine powering eZ Platform Search API by default. When you enable Solr and re-index your content, all your existing Search queries using SearchService will be powered by Solr automatically. This allows you to scale up your eZ Platform installation and be able to continue development locally against SQL engine, and have a test infrastructure, Staging and Prod powered by Solr. This removes considerable load from your database. See further information on the architecture of eZ Platform.
How to set up Solr search engine
Installing the bundle
If you have previously removed the bundle, add/update composer dependencies:
1 2 | |
Make sure EzPublishSolrSearchEngineBundle is activated with the following line
in the app/AppKernel.php file:
new EzSystems\EzPlatformSolrSearchEngineBundle\EzSystemsEzPlatformSolrSearchEngineBundle().
Step 1: Configuring and starting Solr
The example presents a configuration with single core, look to Solr documentation for configuring Solr in other ways, including examples.
Download and configure
Solr versions
From v2, ezplatform-solr-search-engine works with Solr 7 and 8.
Using the most recent version of Solr (7.7 or 8.6) is recommended.
The now deprecated v1 of the bundle works with Solr 6.6.
Solr 7
Download and extract Solr, for example, in version 7.7.2:
Copy the necessary configuration files. In the example below, from the root of your project to the place you extracted Solr:
1 2 3 4 5 6 7 8 9 10 11 12 13 | |
SolrCloud
SolrCloud is a cluster of Solr servers. It enables you to:
- centralize configuration
- automatically load balance and fail-over for queries
- integrate ZooKeeper for cluster coordination and configuration
To set SolrCloud up follow SolrCloud reference guide.
Further configuration
The bundle does not commit Solr index changes directly on repository updates, leaving it up to you to tune this using solrconfig.xml as best practice suggests.
This setting is required if you want to see the changes after publish. It is strongly recommended to set-up solrconfig.xml like this:
1 2 3 4 5 6 7 8 9 10 11 | |
Generating configuration
The command line tool bin/generate-solr-config.sh generates Solr 7 configuration automatically.
It can be used for deploying to eZ Platform Cloud (Platform.sh) and on-premise installs.
Execute the script from the eZ Platform root directory for further information:
1 | |
Step 2: Configuring the bundle
The Solr Search Engine Bundle can be configured in many ways. The config further below assumes you have parameters set up for Solr DSN and search engine (however both are optional), for example (in parameters.yml):
1 2 3 | |
Single-core example (default)
Out of the box in eZ Platform the following is enabled for a simple setup (in config.yml):
1 2 3 4 5 6 7 8 9 10 11 | |
Shared-core example
The following example separates one language. The installation contains several similar languages, and one very different language that should receive proper language analysis for proper stemming and sorting behavior by Solr:
1 2 3 4 5 6 7 8 9 10 11 12 13 14 15 16 17 18 19 | |
Multi-core example
If full language analysis features are preferred, then each language can be configured with separate cores.
Note
Make sure to test this setup against a single-core setup, as it might perform worse than single-core if your project uses a lot of language fallbacks per SiteAccess, as queries will then be performed across several cores at once.
1 2 3 4 5 6 7 8 9 10 11 12 13 14 15 16 17 18 19 20 21 22 23 24 25 26 27 28 29 30 31 32 33 34 35 36 37 38 39 40 41 42 43 44 45 46 | |
SolrCloud example
To use SolrCloud you need to specify data distribution strategy for connection via the distribution_strategy option to cloud.
The example is based on multi-core setup so any specific language analysis options could be specified on the collection level.
1 2 3 4 5 6 7 8 9 10 11 12 13 14 15 16 17 18 19 20 21 22 23 24 25 26 | |
This solution uses the default SolrCloud document routing strategy: compositeId.
Solr Basic HTTP Authorization
Solr core can be secured with Basic HTTP Authorization. See more information here: Solr Basic Authentication Plugin. In the example below we configured Solr Bundle to work with secured Solr core.
1 2 3 4 5 6 7 8 | |
Obviously, you should pass credentials for every configured and HTTP Basic secured Solr core. Configuration for multi core setup is exactly the same.
Step 3: Configuring repository with the specific search engine
The following is an example of configuring Solr search engine, where connection name is same as in the example above, and engine is set to solr:
1 2 3 4 5 6 7 8 | |
%search_engine% is a parameter that is configured in app/config/parameters.yml, and should be changed from its default value legacy to solr to activate Solr as the search engine.
Step 4: Clear prod cache
While Symfony dev environment keeps track of changes to YAML files, prod does not, so clear the cache to make sure Symfony reads the new config:
1 | |
Step 5: Run CLI indexing command
The last step is to execute the initial indexation of data:
1 | |
Possible exceptions
If you have not configured your setup correctly, some exceptions might happen on indexing. Here are the most common issues you may encounter:
- Exception if Binary files in database have an invalid path prefix
- Make sure
var_diris configured properly inezplatform.ymlconfiguration. - If your database is inconsistent in regards to file paths, try to update entries to be correct (make sure to make a backup first).
- Make sure
- Exception on unsupported Field Types
- Make sure to implement all Field Types in your installation, or to configure missing ones as NullType if implementation is not needed.
- Content is not immediately available
- Solr Bundle on purpose does not commit changes directly on Repository updates (on indexing), but lets you control this using Solr configuration. Adjust Solr's
autoSoftCommit(visibility of changes to search index) and/orautoCommit(hard commit, for durability and replication) to balance performance and load on your Solr instance against needs you have for "NRT".
- Solr Bundle on purpose does not commit changes directly on Repository updates (on indexing), but lets you control this using Solr configuration. Adjust Solr's
- Running out of memory during indexing
- In general make sure to run indexing using the prod environment to avoid debuggers and loggers from filling up memory.
- Flysystem: You can find further info in https://jira.ez.no/browse/EZP-25325.
Configuring the Solr Search Engine Bundle
Boost configuration
Index time boosting
Index time boosting was deprecated in Solr 6.5 and removed in Solr 7.0. Until query time boosting is implemented, there is no way to boost in the bundle out of the box.
How boosting interacts with Search API
Boosting of fields or documents will affect the score (relevance) of your search result hits
when using Search API for any Criteria you specify on $query->query, or in REST by using Query element.
When you don't specify anything to sort on, the result will be sorted by this relevance.
Anything set on $query->filter, or in REST using Filter element, will not affect scoring and only works
as a pure filter for the result. Thus make sure to place Criteria you want to affect scoring on query.
Boosting currently happens when indexing, so if you change your configuration you will need to re-index.
Boosting tells the search engine which parts of the content model have more importance when searching, and is an important part of tuning your search results relevance. Importance is defined using a numeric value, where 1.0 is default, values higher than that are more important, and values lower (down to 0.0) are less important.
Boosting is configured per connection that you configure to use for a given Repository, like in this config.yml example:
1 2 3 4 5 6 7 8 9 10 11 12 13 | |
The configuration above will result in the following boosting (Content Type / Field):
article/title: 2.0news/description: 1.0(default)article/text (meta): 5.0blog_post/name (meta): 10.0article/name (meta): 2.0
How to configure boosting on specific fields
Currently, boosting on particular fields is missing. However, it could be configured using 3rd party Novactive/NovaeZSolrSearchExtraBundle in case of custom search implementation, e.g. to handle your front-end search form. Unfortunately, this doesn't affect search performed in the administration interface.
The following example presents boosting configuration for Folder's name and description fields.
First, in ezplatform.yml configure custom fulltext fields.
1 2 3 4 5 6 7 8 | |
The second step requires you to use \Novactive\EzSolrSearchExtra\Query\Content\Criterion\MultipleFieldsFullText instead of default \eZ\Publish\API\Repository\Values\Content\Query\Criterion\FullText.
The following example shows custom query which benefits from the custom fields created in the previous example.
1 2 3 4 5 6 7 8 9 10 11 12 13 14 15 16 17 18 19 20 21 22 23 24 25 26 27 28 29 30 31 32 33 34 35 36 37 38 39 40 41 | |
Remember to clear the cache and perform search engine reindex afterwords.
The above configuration will result in the following boosting (Content Type / Field):
folder/name: 20.0folder/description: 10.0
Indexing related objects
You can use indexation of related objects to search through text of related content. Indexing is disabled by default. To set it up you need to define the maximum indexing depth using the following YAML configuration:
1 2 3 4 5 6 7 8 9 10 11 | |
Configuring Solr Replication (master/slave)
Note
The configuration below has been tested on Solr 7.7.
Configuring Master for replication
First you need to change the core configuration in solrconfig.xml (for example */opt/solr/server/ez/collection1/conf/solrconfig.xml).
You can copy and paste the code below before any other requestHandler section.
1 2 3 4 5 6 7 8 9 10 11 12 13 | |
Then restart the master with:
1 | |
Configuring Slave for replication
You have to edit the same file on the slave server, and use the code below:
1 2 3 4 5 6 7 8 9 10 11 12 13 14 15 16 17 18 19 20 21 22 23 24 25 26 27 28 29 30 31 32 33 34 35 | |
Next, restart Solr slave.
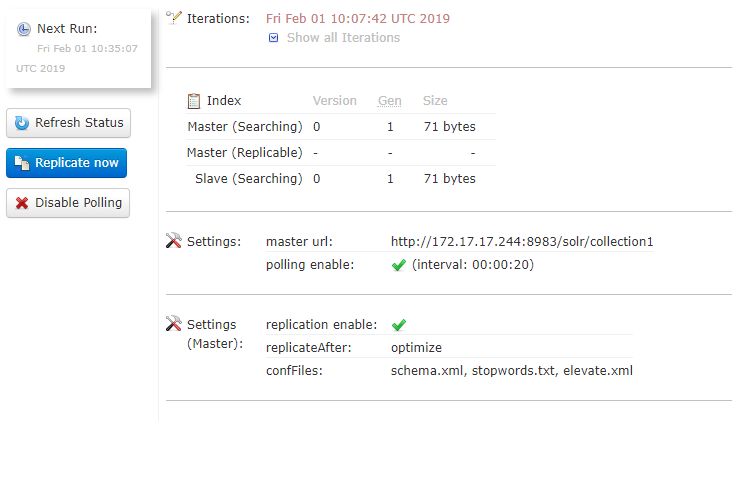
Connect to the Solr slave interface (http://localhost:8983/solr), go to your core and check the replication status:
Extending Solr
To learn how you can create document field mappers, custom search criteria, custom sort clauses and aggregations, see Solr extensibility.